Mastering Urban Texture: A Practical Guide to Spray Paint Circles Photoshop Brushes
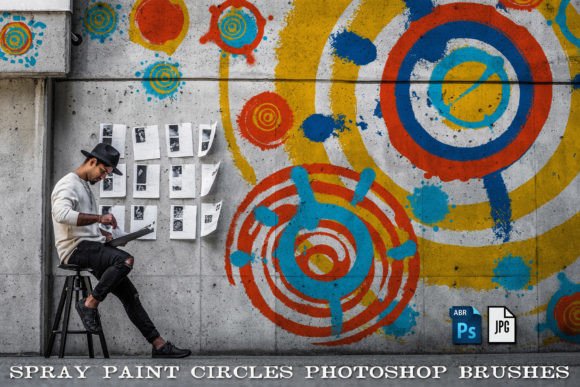
Digital design often suffers from being too clean. In a world of perfect vectors and smooth gradients, adding grit, texture, and organic imperfection can transform a flat composition into something that feels tangible and alive. This is where specialized tools like Spray Paint Circles Photoshop Brushes become invaluable assets for creators. Whether you are designing album covers, creating sublimation prints for apparel, or assembling digital junk journals, these brushes offer a quick way to introduce authentic street-art aesthetics without the mess of actual aerosol cans.
However, simply downloading a brush pack is not enough to guarantee professional results. Many designers, from beginners to seasoned freelancers, make critical errors in how they select, install, and apply these textures. Understanding the nuances of this specific set—which includes 35 different faux spray paint circle brushes along with flattened black and white JPG files—can save you time and elevate the quality of your final output.
The Misconception of "One-Size-Fits-All" Textures
A common mistake users make when acquiring new digital assets is assuming that all spray paint effects are created equal. They download a generic pack, apply it at full opacity, and wonder why their design looks muddy or artificial. The reality is that authentic spray paint varies significantly based on nozzle pressure, distance from the surface, and the type of cap used.
This particular collection addresses that variety by offering 35 distinct variations. Yet, many users overlook this diversity. They might pick the first brush in the list and stick with it throughout an entire project. This leads to repetitive patterns that the human eye quickly identifies as digital rather than organic. To avoid this, treat each brush as a unique tool. Some may produce tight, concentrated dots ideal for stenciling, while others create wide, misty halos perfect for background ambiance.
Practical Advice: Before starting your main design, open a blank canvas and test every single brush in the .abr file. Note which ones work best for foreground elements versus background textures. This small investment of time prevents the frustration of trying to force an unsuitable brush to do a job it wasn’t designed for.
Ignoring the Power of Black and White JPGs
Another overlooked detail in this package is the inclusion of flattened black and white JPG files. Many digital artists focus exclusively on the .abr brush file, ignoring the static images entirely. This is a missed opportunity for efficiency and compatibility. Not everyone uses Adobe Photoshop, and even those who do may find brushes cumbersome for certain workflows.
For entrepreneurs and small business owners involved in sublimation projects or print-on-demand services, the JPG files are often more practical. They can be easily imported into programs like Canva, Procreate, or Silhouette Studio without needing to install custom brush libraries. Furthermore, using a pre-rendered JPG allows for precise positioning and scaling without the variability of brush strokes, which is crucial when aligning designs for decoupage or image transfers.
If you rely solely on the brushes, you may encounter inconsistencies when collaborating with team members who do not have the same font or brush libraries installed. Sharing the JPG assets ensures that your visual intent remains intact across different devices and software environments.
Overlooking Resolution and Print Quality
When transitioning from screen to physical media, such as paper crafts, collage, or junk journaling, resolution becomes paramount. A frequent error is using low-resolution settings for the brush stamps, resulting in pixelated edges when printed. While the brushes themselves are vector-scalable in terms of placement, the texture detail must be sharp enough to withstand high-quality printing.
Users often forget to check their document settings before applying these textures. If you are designing for a large format poster, a brush setting that looks crisp on a web banner will appear blurry when enlarged. Conversely, for small items like stickers or jewelry tags, overly large brush tips can lose their delicate mist effect.
Key Checkpoint: Always verify your document’s DPI (dots per inch). For print projects, ensure you are working at 300 DPI. When using the JPG files, check their native resolution. If you need to scale them up significantly, consider using AI upscaling tools to maintain edge clarity, or stick to the vector-like scalability of the Photoshop brushes if your workflow allows.
Misusing Layer Blending Modes
Perhaps the most impactful technical mistake involves layer blending modes. Beginners often leave spray paint textures on the "Normal" blending mode, which makes them look like opaque stickers pasted on top of the artwork. This destroys the illusion of depth and integration.
To achieve a realistic look, you must experiment with blending modes such as Multiply, Overlay, or Soft Light. Multiply is particularly effective for black and white assets because it allows the white areas to become transparent while darkening the underlying colors. This mimics how real spray paint interacts with porous surfaces.
Additionally, adjusting the opacity and flow settings within Photoshop is essential. Real spray paint is rarely 100% opaque in a single pass. By lowering the flow, you can build up layers gradually, creating a sense of depth and variation that mimics the natural accumulation of pigment. Ignoring these controls results in flat, cartoonish graphics that lack the gritty authenticity you are aiming for.
Neglecting Legal and Commercial Usage Rights
For marketers, bloggers, and freelancers, understanding licensing is non-negotiable. A subtle but dangerous mistake is assuming that because a resource is downloaded, it is free for commercial use. While this set is designed for versatile applications including sublimation and digital designs, always confirm the specific license terms provided by the creator.
Using assets incorrectly can lead to copyright strikes or legal issues, especially when selling physical products like t-shirts or home decor. Ensure that the license covers both digital distribution and physical end-products. If you are unsure, reach out to the creator or keep documentation of your purchase. This due diligence protects your business reputation and ensures long-term sustainability.
Final Thoughts on Integration
Incorporating Spray Paint Circles Photoshop Brushes into your workflow requires more than just installation; it demands an understanding of texture, context, and technical settings. By avoiding the pitfalls of repetitive usage, ignoring alternative file formats, neglecting print resolution, misapplying blending modes, and overlooking licensing, you can unlock the full potential of these tools.
Remember, the goal is not just to add noise to your design, but to enhance its narrative. Whether you are creating a rugged logo for a startup or a delicate collage for a personal journal, these 35 unique circles offer the flexibility needed to achieve professional, authentic results. Take the time to experiment, respect the technical requirements of your medium, and let the organic nature of spray paint breathe life into your digital creations.